Showing posts with label Art. Show all posts

Wednesday, September 12, 2012


Kid’s Corner

{Week 2: Art}

Activity: Fall Leaves by Briana

Theme: Fall Days         Color: Orange

Please visit the link Kid’s Corner to learn how easy it is to complete our lessons with your child!

Daily Opener:  
  1. Prayer {Say a prayer with your child}
  2. Calendar {Click on the link to learn how to use the calendar}.
  3. ABC / 123 Song {Sing the ABC’s with your child & sing numbers 1-10 with your child}.

Description:  Your child will learn the colors of fall leaves by completing an art activity.

Materials:
·         White Construction Paper
·         Green, Red, Orange, Yellow Kid Friendly Paint
·         Paper Plate
·         Paper Towel or Toilet Paper Roll
·         Brown Marker
·         Ice Cream Scoop

Directions:
  1. Cut four 2 inch strips out of the paper towel roll.
  2. Flatten the four strips to create a leaf shape. 
  3. Draw a tree using the brown marker onto the white construction paper. 
  4. Place four paint colors onto the paper plate.
  5. Arrange the paper, paint, and paper towel leaves onto the table for your child to use.
  6. Demonstrate how to dip paper towel leaves into the paint and onto the paper to create leaves.
  7. Have your child dip leaves into all four paint colors and paint the leaves onto the tree.
  8. When finished, ask your child a few questions for a CM learning opportunity:
    1. How many leaves do you see?
    2. How many green leaves do you see?  {Repeat with orange, red, and yellow}.
    3. What colors can leaves be in the fall?
  9. Then praise your child for a job well done and hang up his/her artwork in the house to display.

Learning Opportunity
  1. Your child will practice using their motor skills by painting the leaves.
  2. Your child will learn the colors of fall leaves by completing the activity.
  3. Your child will practice counting and observing during the activity.

Read Aloud:  
Fall Leaves {By Briana}

Fall leaves are yellow,
Blowing in the wind,
Fall leaves are red,
Bright and beautiful,

Fall leaves are orange,
Moving left and right,
Fall leaves are green,
They are a pretty sight!

Daily Craft: Activity Jar {Click on the link to learn about using the activity jar}

*Stallone Tested and Approved:  This art activity is a fun way to recycle your paper towel rolls.  Stallone enjoyed making his artwork. He enjoyed dipping the leaves into the paint and placing them onto the paper.  It was fun to see him arrange his leaves onto the tree.  He learned about the colors the leaves can be in the fall as well.  This is such a fun activity to try with your child!

  Finished artwork sample :)
 Materials needed for the activity.
Paper towel rolls cut into fours, then flattened to create a leaf look.
Draw a tree with a brown marker to create tree base for leaves.
Dip paper leaves into paint.  Be sure to coat all the edges.
A glimpse of the finished piece.  

Wednesday, August 1, 2012


{Week 1: Art}

Activity: Noodle Painting by Briana

Theme: School Days         Color: Yellow

Please visit the link Kid’s Corner to learn how easy it is to complete our lessons with your child!

Daily Opener:  
1.       Prayer {Say a prayer with your child}
2.      Calendar {Click on the link to learn how to use the calendar}.
3.          ABC / 123 Song {Sing the ABC’s with your child & sing numbers 1-10 with your child}. 

Description:  Your child will create an art piece by rolling noodles in paint and onto paper.     

Materials:
·          Kid Friendly Paint {Red, Blue, Yellow}
·          Dry Noodles {Any Variety}
·          White Construction Paper
·          Paper Plate

Directions:
1.       Prep: Pour paint colors onto paper plate.  Lay all materials on the table for the art activity.
2.      Demonstrate to your child how to roll the noodles in the paint and onto the paper to create a design. 
3.      Have your child roll the noodles in the paint and onto the paper.
4.      While your child is painting, ask them a few questions to increase learning:
a.      What color are you painting with?
b.      What shape is the noodle?
c.       What happens when you mix {blue and yellow} together?
5.      Be sure to praise your child as he/she is creating his/her art piece.                      
6.      When finished, allow the art piece to dry, and then hang it up in the house to show the family!

Learning Opportunity
1.   Your child will practice using their fine motor skills while rolling the noodles.
2.  Your child will practice learning colors while completing the activity.
3.   Your child will gain confidence while participating in the activity.

Read Aloud:  
Noodles {By Briana}

Noodle, noodle, noodles,
Are fun to eat,
Noodle, noodle, noodles,
Are my favorite treat,

Noodle, noodle, noodles,
Are very delicious,

Noodle, noodle, noodles,
Are also nutritious,

Noodle, noodle, noodles,
Are fun to toss,

Noodle, noodle, noodles,
Are yummy with red sauce!

Daily Craft: Activity Jar {Click on the link to learn about using the activity jar}

*Stallone Tested and Approved:  Stallone really enjoys completing activities that involve painting.  Today, he loved the Noodle Painting activity.  We used red, yellow, and blue to paint with, so we could see what colors they create when mixed.  Stallone loved saying “noodles” as he completed the activity.  He really enjoyed showing his Mom his finished piece!  This is a fun art activity to try!

Materials

Finished Piece 

Monday, July 2, 2012


{Week 1: Art}

Activity: American Flag by Briana

Theme: Patriotic Days         Color: Blue

Please visit the link Kid’s Corner to learn how easy it is to complete our lessons with your child!

Daily Opener:  
1.       Prayer {Say a prayer with your child}
2.      Calendar {Click on the link to learn how to use the calendar}.
3.          ABC / 123 Song {Sing the ABC’s with your child & sing numbers 1-10 with your child}. 

Description:  Your child will create an American flag by finger painting.

Materials:
·          White construction paper
·          Kid friendly paint {red and blue}
·          Paper plate {place red and blue paint on plate}
·          Pencil

Directions:
1.      Prep:  Draw a square on the left corner of the paper.  Write a few “B’s” to show where your child will create the blue stars.  Draw a few lines to represent the flag.  Write the word “RED” on the lines that you want your child to finger paint red. 
2.    Place the prepared white paper and paint on the table.
3.      Have your child count all of his/her fingers, to practice counting.
4.      Explain to your child that he/she will be using his/her thumb to create an American Flag today.
5.      Demonstrate how to finger paint, and have your child begin creating!
a.  Assist your child when needed, to help guide him/her through the activity. 
b.  Remember to use encouraging words as he/she completes the activity.
7.    When finished, display the American flag art on the wall to show the whole family!
8.   End today’s lesson by singing the song “You’re a Grand Old Flag” with your child.

Learning Opportunity
1.   Your child will practice following directions during the activity.
2.  Your child will practice counting during the activity.
3.   Your child will gain confidence while using his/her creativity to create the American flag.

Read Aloud:  
You’re a Grand Old Flag {By George M. Cohan}

You're a grand old flag,
You're a high flying flag
And forever in peace may you wave.
You're the emblem of
The land I love.
The home of the free and the brave.

Ev'ry heart beats true
'neath the Red, White and Blue,
Where there's never a boast or brag.
Should auld acquaintance be forgot,
Keep your eye on the grand old flag.
You're a grand old flag,
You're a high flying flag
And forever in peace may you wave.
You're the emblem of
The land I love.
The home of the free and the brave.

Ev'ry heart beats true
'neath the Red, White and Blue,
Where there's never a boast or brag.
Should auld acquaintance be forgot,
Keep your eye on the grand old flag.

Daily Craft: Activity Jar {Click on the link to learn about using the activity jar}

*Stallone Tested and Approved:  Stallone loved finger painting today.  He had a great time making his American flag.  He loved saying the color “Blue” and watching his white paper turn into something beautiful.  It is such a joy watching Stallone gain confidence while using his creativity to complete art lessons.   Today’s lesson is perfect to get you and your child into the 4th of July spirit!

Materials


Monday, June 4, 2012


Kid’s Corner

{Week 2: Art}

Activity: Starfish by Briana

Theme: Summer Days         Color: Yellow

Please visit the link Kid’s Corner to learn how easy it is to complete our lessons with your child!

Daily Opener:  
  1. Prayer {Say a prayer with your child}
  2. Calendar {Click on the link to learn how to use the calendar}.
  3. ABC / 123 Song {Sing the ABC’s with your child & sing numbers 1-10 with your child}. 
Description:  Your child will learn how to make a starfish by using simple materials.

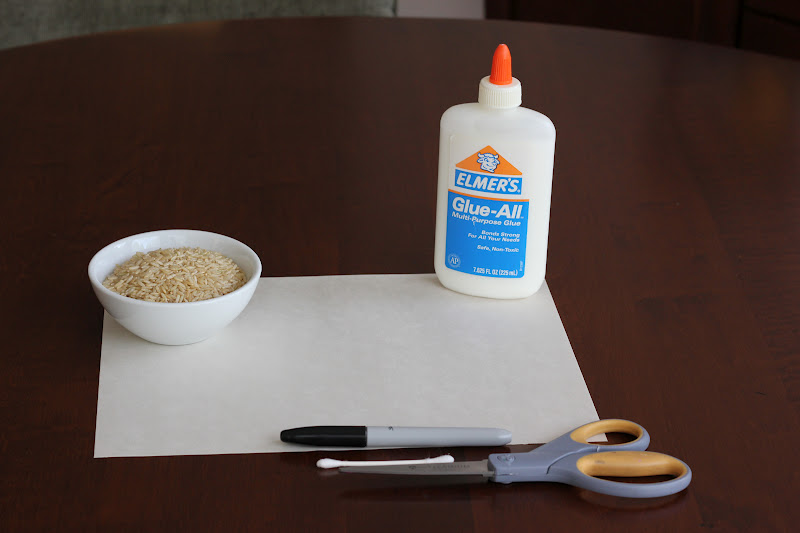
Materials:
·         One white and blue construction paper
·         Brown Rice
·         Glue
·         Scissors
·         Q-tip
·         Pen

Directions:
  1. Discuss the word “starfish” with your child.  Explain how to spell the word and where you can find a starfish. 
  2. Help your child draw a starfish on the white piece of paper.
  3. Have your child cut out the starfish and assist when needed. 
  4. Place some glue on the starfish and you can spread it with a q-tip to cover the surface evenly.
  5. Have your child place the rice on the starfish.  Be sure to press firmly so the rice will stick to the glue.  Allow to dry for a few minutes. 
  6. Once it is dry, shake the excess rice off, to reveal the beautiful starfish!
  7. When finished, display the artwork on a wall in your home, so your child can show others his/her artwork! 
  1.  Learning Opportunity
  1. Your child will learn the word “starfish”
  2. Your child will practice drawing and using scissors during the art lesson.
  3. Your child will gain confidence while completing the activity. 
Read Aloud:  
Starfish {By Briana}

Sally the Starfish lives in the sea, 
Sally the Starfish is as happy as can be,

Sally the Starfish swims real fast,
She swims up and down and to the top at last,

Sally the Starfish loves the water,
Especially on summer days when the weather is hotter,

Sally the Starfish is ready for bed,
She nestles in the sand where she can rest her little head.

Daily Craft: Activity Jar {Click on the link to learn about using the activity jar}

*Stallone Tested and Approved:  Stallone had a great time making the starfish today.  He loved placing the rice on the starfish.  He loved saying the word “starfish” and he can’t wait to see one in real life!  He thought the texture of the brown rice on the starfish was really neat.  Overall, this is a great art activity to kick off the summer days!

Materials


Monday, May 7, 2012


Kid’s Corner

{Week 2: Art}

Activity: Daffodil by Briana

Theme: Blooming Days         Color: Purple

Please visit the link Kid’s Corner to learn how easy it is to complete our lessons with your child!

Daily Opener:  
  1. Prayer {Say a prayer with your child}
  2. Calendar {Click on the link to learn how to use the calendar}.
  3. ABC / 123 Song {Sing the ABC’s with your child & sing numbers 1-10 with your child}. 
Description:  Your child will learn how to make a daffodil by using simple materials.

Materials:
·         One white, green, and yellow construction paper
·         One cupcake liner
·         Picture of a daffodil
·         Scissors
·         Tape or glue
·         Pen

Directions:
  1. Write the word “Daffodil” on the white piece of paper.  Discuss how to spell the word.  Discuss that a daffodil is a type of flower. 
  2. Count how many petals are on the daffodil in the picture. 
  3. Help your child draw the daffodil on the yellow piece of paper.
  4. Help your child draw a stem and a few leaves on the green piece of paper.
  5. Have your child cut out the flower, stem, and leaves, and assist when needed. 
  6. Have your child tape or glue the flower, stem, and leaves onto the white paper.
  7. For the finishing touch, tape or glue the cupcake liner in the center of the flower.
  8. When finished, display the artwork on a wall in your home, so your child can show others his/her artwork!
  9. Optional: After, take a walk outside to search for daffodils! 
  1.  Learning Opportunity
  1. Your child will learn the word “daffodil”
  2. Your child will practice drawing and using scissors during the art lesson.
  3. Your child will gain confidence while completing the activity. 
Read Aloud:  
Daffodil {By Briana}
{Inspired by Jack and Jill}

A daffodil went up the hill,
To sip some fresh water,

The daffodil got plenty to drink,
But then he began to sink,

The daffodil came down the hill,
To find its soil-rich home,

The daffodil pedaled real fast,
to find its family waiting for him at last!

Daily Craft: Activity Jar {Click on the link to learn about using the activity jar}

*Stallone Tested and Approved:  Stallone enjoyed the daffodil art lesson today.  He liked learning a new word, as he hasn’t seen a daffodil before.  He loved counting the petals and putting the cupcake liner on the flower.  He enjoyed hanging his very own artwork on the wall to show his parents.  This art lesson is a really fun way for your child to practice his/her fine motor skills. 

Materials
Drawing the Daffodil
Finished Daffodil!